Sprig and Quill

farming

Grey water is waste water from your house that is not from your toilet, and is instead from things like your shower, sink, and dishwasher. Instead of letting the water go down the drain, some people are reusing their grey water to both save water and (for those with water-bills) save money.

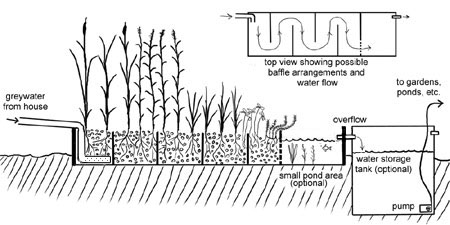
How it typically works is that the grey water is piped into a series of natural filters, so that the result is surprisingly clean water without the use of chemicals. That water (while not drinkable) can be used to water plants.

Do note that to use this system, you must use bio-degradable detergents, soaps, and so on. Non-biodegradable products may be too harsh for your system to break down and could harm plants and wildlife.


Garden System:

Water is piped out into a filtration system series. Here is a common setup:

Course Medium:

Something to catch foods and other solids. Examples: – A container of mulch or coconut fibre with worms. The worm castings (waste) can be removed for the garden. – A container of sand.

Grease Trap:

The oil and geese will raise to the surface of the water as it settles, so that it can be removed from the water. – 📺 How to make the easiest home-made grease trap by Off Gridding on a Shoestring – 📺 How a Grease Trap Works by Southwaste Disposal LLC

Mock Wetlands:

wetland plants grown in a gravol rock medium (such as volcanic rock). The plants and microorganisms will help break down food particles and minor pollutants into harmless elements. Some wetland plants are even known to remove heavy metals. – 📺 How to Recycle Waste Water Using Plants by Andrew Millison

Holding tank.

A tank to hold the now filtered water.

Suggested Videos: – 📺 Simple Permaculture-Based Grey-Water Treatment System

Greywater | Source: Lawrence Fields.


Toilet System:

Some companies (such as Aqualoop are selling systems that clean your water in a reservoir within your house, so that the grey water can be used within toilets. There is little point to use potable (drinkable) water within your toilet, so these systems can save money and water.

#water #garden #farming #greywater

SprigLogo

Seeds As Intellectual Property

Seeds might seem like a non-controversial subject, but it can get very tricky. Let's say you breed some oat varieties together to create a plant that is resistant to a type of blight. Well, now you can claim the plant as your intellectual property, and thus make it illegal for farmers to save the seeds from the crops they grow. If the farmers want to protect their crops from blight, they'll have to buy your seeds every single year. 1 2

As this continues, companies try to increase the production of the crops (for example, bigger than ever strawberries), sometimes at the cost of breeding out nutritional properties  and varieties that might have resistance to other risks (for example, a plant having higher resistance to droughts).

There are some efforts to fight this, however. For example, there is the Open Source Seed Initiative and Open Source Seeds which both aim to protect and increase options for seeds that are public domain.

Seed Bombs

Masanobu Fukuoka (1913 – 2008) was a promoter of no-till and natural farming from Japan, and was well known for his work on fighting desertification. 

He was a microbiologist and agricultural scientist specializing in plant pathology, and his personal research and writings earned him awards as he traveled the world teaching(including meeting with the United Nations).

Seedball is a mixture of clay and various seeds, that allows the seeds to stay protected inside the ball until it rains, and the conditions become favourable for sprouting.

One aspect he was most known for was his use of seed balls, which was an ancient technique he re-discovered and popularized. The idea is that the seeds are protected, but will become exposed when it rains. As the clay breaks apart, the seeds that are meant to grow will grow.

In 1973, those seed bombs started being used by Liz Christy for guerrilla gardening, and has been used for that since.

DIY Seed Bombs:

  1. Gather a variety of seeds, and mix them together
  2. Knead the clay, adding small amounts of water. Kneed well to avoid cracks.
  3. Mix seeds into a small amount of clay so that the seeds are not exposed and roll into a round shape.
  4. Throw the seed balls where you want them to grow.

#farming #gardening #permaculture #rewilding

SprigLogo

Aquaponics might seem like something new, but there are ancient versions practised by certain indigenous cultures.


Chinampa

Chinampa Chinampa are a form of aquaponics that the Aztec people made used of extensively. A chinampa is a floating garden built on a freshwater lake, made by making a raft of woven reeds, with stakes to keep it in place. Soil was placed down until it was above the waters surface.

“The earliest fields that have been securely dated are from the Middle Postclassic period, 1150 – 1350 CE.” Wikipedia

This system eliminates the need for watering, and was successful in growing maize, fruit, tomatoes, amaranth, beans, chile, and flowers.

While some are still used today, they are lowering in number as lakes are drained or dried out.

Suggested Videos:


Himalayan Foothills

raad A raad is a floating farm found in Dal Lake in Kashmir.

When a location is chosen, a plant called “piyach” is added. The farmers tend to its growth for the next 2-3 years, ensuring it stays the proper length and width as the roots grow deep into the lake bed. 1

“A raad liven, that looks like a gigantic pincer consisting of two planks – each three feet in width – is lowered by two people in two boats into the soft sediment of the lake bed. A two feet thick slab of soil, held together by the weeds, is manually severed from the bottom of the lake with the help of the planks which are fitted with steel edges. The planks then float to the surface bearing a portion of the lake bed with them. More soil is added to the surface of the raad. The weed decomposes to become a natural fertilizer for the vegetables to be grown.” DownToEarth 2

Suggested Videos:

#aquaponics #food #farming #gardening

SprigLogo

Olla (pronounced oy-ya) is Spanish for clay pot, and work as a garden irrigation system that saves water. 1

ola

The terracotta pots are buried in the soil, and filled with water. That water then slowly seeps into the soil while being protected from surface evaporation. They may save between 60 – 70% of water when compared to the conventional watering can. 1

They are thought to have been used by humans for over 4000 years, and have seen use around the world. 2

“To maximize impact, place ollas every 2 – 3 feet in the garden. Larger ollas, with a 2 or more-gallon capacity, can be placed up to 3 – 4 feet apart.“ [1]

Today, there are many different options: including watering spikes, traditional style olla, and irrigation-ready olla.

ollaphoto

Make Your Own:

If you can not afford or find a traditional Olla, you can create your own.

Supplies:

  • Two plain terracotta pots
  • Terracotta pot saucer/base
  • Silicone glue or another sealant of your choice
  • A flat rock or pot saucer

Instructions:

  1. Fill the drainage hole of one of the pots with the silicone glue. Allow it to fully set.
  2. Use the glue to seal top rims of the two pots together. Allow the glue to fully set.
  3. Dig a hole in your garden deep enough for the top edge of the pot to be just above the soil.
  4. Place in the pot so that the unfilled drainage hole is to the top. Fill in the dirt, leaving the top uncovered.
  5. Fill the pot with water. This is much easier with a funnel (if you have one).
  6. Place the rock or pot saucer over the hole to keep anything from falling in.

#gardening #FarmingAndGardening #farming #water #ollas #olla

SprigLogo

In modern landscaping, any sort of hole or ditch is considered a “dangerous tripping hazard,” “unsightly,” or “a waste of space,” so everything is smoothed out. If you go to most cities and farms, the only non-flat places are designed to carry water away from cities, rather than hold onto it.

This thought process can not only increase overland flooding and wash away topsoil, but it also gives water no place to sit and be absorbed into the soil. Without any water capture gradually trickling into the soil and creating an underground reservoir, the landscape becomes less drought resistant and more susceptible to wildfires.

DwfOODbSyDDk1zi.jpg

Image Source

Swales and the other water catchment methods might be different shapes and use slightly different methods, but they all do all work the same on a basic level. The idea is to dig or build a shape that will slowdown and/or catch some of the movement of water. This can make the soil more absorbent (dry and hardened soil does not absorb water as easily) which promotes healthy microbiome of the soil.

In the process of reversing landscape desertification, it is proving drastically helpful. As the underground water reserves build, so does the vegetation.

The Different Methods:

  • Demi-lunes / Half – moons / Semi-circular bunds [1]
  • Eyebrow terraces / banquettes [2]
  • Negarim [3]
  • Contour bunds [4]
  • Micro basins [5]
  • Planting pits[6] / Zai pits / Chololo pits [7]
  • Swales [8]

In cities, they look like a slight ditch in front of a house, or a creek in a greenspace.

For other landscapes, it could be just slight indents in un-farmable areas, or ditches dug around farm perimeters.

They do not have to be very deep, and often do not need any fancy equipment to dig(most just involve using a shovel), but they can do amazing things.

Image Source: Just Dig It.

Suggested Video:

____________

#permaculture #weather #farming #gardening

SprigLogo

With hydroponics, you replace soil for water and liquid fertilizers.

Hydroponics are becoming more and more popular in an urban setting, because they can be grown in small spaces (such as apartment buildings), and can be built into most unused spaces. For example, in Alberta, Canada, a family converted an unused school into a hydroponic farm that provides fruits and veggies for their town all year. [1]

Setups for hydroponics can range from large factories, to just a small setup on a kitchen counter.

Hydroponics will not work for all crop types (such as trees), and fruits that require pollination may have to be hand-pollinated.

Hydroponic Benefits:

  • Can enable year-round growing.
  • Reduce water usage (compared to conventional farming).
  • No weeds.
  • They do not require soil, which drastically cuts down the chance of pests.
  • Can bring food options into food deserts
  • Can be grown in restrictive spaces (such as indoors).
  • Can avoid harsh weather by being able to be grown in doors

DIY Basic Hydroponics

Supplies:

  • Bin with a lid
  • Drill and drill bit
  • Hydroponic baskets
  • Lava stones or other filler
  • Aquarium bubbler
  • Hydroponic fertilizer solution
  • Water
  • Seedlings

Instructions:

  1. Using a drill bit slightly smaller than the rim of your baskets, drill holes in the lid. Be sure to leave gaps between holes.
  2. Drill a hole for the cable of the aquarium bubbler
  3. Fill the bin with water and add the fertilizer solution
  4. Put on the lid and place baskets into their holes.
  5. Place seedlings into the baskets with the lava stones
  6. Turn on the bubbler

Make sure the setup is in a sunny location, otherwise you will need a grow light.

DIY Window Hydroponics:

NPR and Window Farms

Do you have plastic bottles sitting around? You could consider turning them into a window food garden!

You’ll of course need plants that do not get too big (such as dwarf tomato plants instead of full-sized).

If your window does not get enough sunlight, you may also have to supplement that with grow lights and a plug timer.

Supplies:

  • used water bottles or pop bottles
  • a pump kit (with tubing and joints)
  • a bucket of water
  • growing substrate
  • a hanging anchor kit
  • silicone steel tube
  • chain (for hanging)
  • tools (electric drill, plier, hole punch)

… and convert them into a tiny food garden that hangs by your window. Here is a full tutorial on the setup: https://www.youtube.com/watch?v=igWJ8uqy4


#greenliving #farming #gardening #hydroponics #FarmingAndGardening

SprigLogo

Aquaponics is similar to hydroponics, but makes use of fish to create fertilizer-rich water (from fish waste) for the plants to thrive. In turn, the plants help clean the water for the fish.

You can put the pumps, lights, and fish feeders on timers to automate them, and even use fish types people eat for fish farming.

Aquaponic Benefits:

  • Can enable year-round growing.
  • Reduce water usage (compared to conventional farming).
  • No weeds.
  • Can provide two income sources (plants and fish) [1]
  • Can bring food options into food deserts [2]

Common Aquaponic Fish Mistakes

  • Over-crowded tanks. Too many fish in a tank causes stress, poor water quality, and can increase the chance of disease outbreaks.[3]
  • No Light. Fish need a cycle between light and dark to regulate their circadian rhythm just like people do,[4], so aquaponic fish either need artificial lighting, or a tank that gets sunlight.
  • No Gravel: Gravel is not just for appearance, it can also help regulate the water quality for fish, provide enrichment, and reduce reflections. [5]
  • No Hiding Spots: Having places to hide can make a fish feel safer and so less stressed. One easy option is driftwood. [6]
  • No Bubblers: If you are not going to have water constantly flowing between your tanks and plants, then you will need bubblers to increase oxygen in the tank for the fish[7] and also reduce algae.[8]

Suggested Videos:

What's So Great About Aquaponics?

“Ever heard of aquaponics? In urban areas, aquaponics helps combat barriers that come with farming in cities, like lack of access to space. “

How This Aquaponics Farmer Is Reinventing Urban Agriculture

“There are so many barriers in place when it comes to growing food in cities, but education and lack of access to space are the hardest to overcome. Yemi Amu has dedicated her life as a farmer to solving this problem, by starting the only Aquaponics farm in NYC. Oko Farms in Brooklyn is both a working farm which provides fresh food to surrounding neighborhoods, while also actively engaging the public in education on how to grow food for yourself in urban environments.”


#farming #gardening #greenliving #aquaponics #FarmingAndGardening

SprigLogo

Did you know that you can grow your own bath sponges?

“Luffa is a genus of tropical and subtropical vines in the pumpkin, squash and gourd family.“ Wikipedia

Image of a Luffa

Luffa plants are from southeast Asia, and can be grown in places with a long warm summer. The fruit can take a long time to grow and toughen it's inner fibers (about 150-200 days), but after that time, they are ready to become sponges. Explaining it simply, you peel the skin, wash the insides, hang them to dry, then you are done.

“Getting all the seeds out can be a challenge, but the drier the sponges are, the easier the seeds will fall out. Save the best ones for next year. You can also cut open the sponges in any shape you want to remove seeds or make a loofah fiber mat.“ luffa.info

When done, you can use the sponges for bathing, washing dishes, and even as industrial filters. [1]

Luffa sponge photo


Suggested Videos


#gardening #farming #greenliving #plasticfree #zerowaste #FarmingAndGardening

SprigLogo

Dust storm approaching Stratford, Texas.

Have you heard of The Great Dust Bowl? It was a series of dust storms in the USA that were so intense, they killed crops, livestock, and people during the the great depression.

The situation was amplified by a drought, but the dust was also human caused.

“Following years of overcultivation and generally poor land management in the 1920s, the region—which receives an average rainfall of less than 20 inches (500 mm) in a typical year—suffered a severe drought in the early 1930s that lasted several years. The region’s exposed topsoil, robbed of the anchoring water-retaining roots of its native grasses, was carried off by heavy spring winds. “ Britannica[1]

This dust storm was so thick that it blocked the sun.

“Dear Mr. Roosevelt, Darkness came when it hit us. Picture taken from water tower one hundred feet high. Yours Truly, Chas. P. Williams.” An unknown author writes to Roosevelt[2]

Under the hands of desperate farmers, grasslands turned to landscapes so lifeless and dangerous, that many people abandoned their dreams and left.

Why Rototilling Harms Soil

Image source

One of the practices that amplified this disaster (that is a current farming practice to this day) is rototilling. During this, you flip the soil over, which can make planting easier. This comes with many problems, including:

  • Destroying the soil microbiome. Healthy soil means healthy crops. [3]
  • More weeds. As you flip your soil you are allowing dormant seeds a chance to thrive
  • Soil Compaction: As the soil gets more compact, it becomes harder for roots to work through it.
  • Washing or blowing away top soil. Top soil is where the heathiest soil is, and it can be washed away if left uncovered
  • Drying the soil. By leaving the soil exposed you are letting the sun bake out any moisture [4]

Ways to Improve Soil Health

  • Crop rotation. This is a pre-medieval technique where you rotate what crops you grow in what soil. This can add nutrients to the soil, avoid nutrient depletion, reduce diseases, and reduce pests. [5]
  • Cover Crops. Never leave your soil bare. Cover crops can save your soil. [6]
  • Water Catchments. These slow down the movement of water, encouraging the soil absorbing it. Examples: bunds or swales.
  • Food forests. Instead of rows of monoculture, food forest combine several different types of plants in a way that mimics a forest.
  • Reducing food waste. To take pressure off food production. In Canada alone, $31 billion dollars worth of food waste is thrown out a year.
  • Mulch. Putting mulch down can protect your soil while also keeping down weeds.
  • Planting trees and bushes. Even if it is just on the outside perimeter of your crops, trees and bushes can help hold soil in place, reduce wind, and improve the general health of the area.

#farming #gardening #permaculture #FarmingAndGardening

SprigLogo

A food forest(sometimes also called “agroforestry”) is a permaculture method which mimics a forest when planning out a food garden.

“A food forest, also called a forest garden, is a diverse planting of edible plants that attempts to mimic the ecosystems and patterns found in nature.” | Project Food Forest [1]

With proper care, a food forest can even last generations. For example, in the 1920’s near Philadelphia(USA), John Hershey created a food forest. Although today that land has been broken up by urban sprawl, many of the trees survive today in empty lots, backyards, and by parking lots.

There are pecans, walnuts, persimmons, apples, and many more, all growing without maintenance. [2][3]

Parts of a Food Forest:

These gardens are typically broken down into these layers:

  1. Canopy: large fruit or nut trees
  2. Understory: dwarf fruit trees, like pears, juneberries, mulberries, and more.
  3. Shrubs: berries, like elderberry, currants, blueberries, and more
  4. Herbaceous: Herbs, like mint, lemon balm, comfrey, and more.
  5. Rhizosphere: Potatoes, sweet potatoes, ground nuts
  6. Climbing: Peas, grapes, hardy kiwi, honeysuckle.
  7. Ground Cover: Strawberries, catnip, walking onion.

However, it is important to note that what plants you use will be specific to what can grow in your area.

FoodForest

Food Forest Benefits:

  • Promoting a healthy soil microbiome
  • Increased carbon-capture (no-till)
  • Preventing erosion
  • Retaining water
  • Low maintenance
  • Can support wildlife biodiversity

[4][5]

References:

  1. https://projectfoodforest.org/what-is-a-food-forest/
  2. https://www.shelterwoodforestfarm.com/blog/2018/10/17/exploring-americas-oldest-food-forest
  3. https://m.youtube.com/watch?v=qQZTmb_1
  4. https://grocycle.com/food-forest-layers/
  5. https://twobrothersindiashop.com/blogs/farmers-kitaab/food-forests-and-soil-health

#permaculture #farming #greenliving #foodforest #FarmingAndGardening

SprigLogo